Wednesday, October 31, 2012

SNEAK PEEK!


What have I been creating???  You will need to visit my blog to find out how I am using these fantastic embellishments and papers from Fabscraps!!
I have also been using a most fantastic product from X-Press It but you will have to pay a visit to find out which product it is!!!
Looking forward to seeing you visit and leave a comment or two on my blog!

Pin It

Tuesday, October 30, 2012

Halloween Blog Hop Winners


Congratulations to the winners of our blog hop!! If you see your name below, please send an email to sascha@xpressgraphx.com.au with the Subject: Blog Hop and "Your Postal Address". We will post your goodies off to you ASAP. 
o   Copic Oz Blog Winner- EmbossingQueen 
o   Edna’s Blog Winner- Datsu
o   Mandi’S Blog Winner-Alethea
o   FabScraps Oz Blog Winner- DebiJ
o   Marelle’s Blog Winner- Fiona Powell
o   Tarrah’s Blog Winner- Kerri

o   X-Press It Blog Winner- Alshandra 
o   Kathy’s Blog Winner- Gab 
o   Sharmaine’s Blog Winner- Rachel Marks
Here is another look at the Prize Pack that will be going out to DebiJ from the FabScraps Oz Blog... and there are 8 additional happy winners from each of the blogs on the Hop!!
Pin It

Friday, October 26, 2012

Fabscraps Halloween Blog Hop....

Welcome to our Halloween Hop sponsored by Copic, FabScraps, La-La Land Crafts and X-Press It. Today we are teaming up to share some Halloween fun. Whether you love scrapbooking or stamping, colouring or card making there should be something to inspire your creativity. Of course there is also awesome blog candy to be won! 


Simply leave a comment on each of the 9 blogs throughout the hop and you have the chance to win a fantastic trick or treat pack of blog candy on EACH of the 9 blogs!

 If you are just joining us on the hop, you are going to want to start at the beginning at www.copicoz.blogspot.com 


Tarrah has made a Trick or Treat bag using a paper bag, one sheet of the FabScraps 'Fleur' paper from the Classic collection and a few embellishments all adhered with the fabulous X-Press It adhesives!


Thank you for stopping by to see my creation! Be sure to visit the rest of the designers participating in this blog hop, click on the next name on the list below. Also don't forget to leave a comment to win some blog candy. This blog hop finishes at 12:01am AEST on October 29, 2012. Enjoy the hop and happy Halloween!

                   Copic Oz
  Edna
  Mandi
  Kathy

Thanks so much for leaving a comment and good luck, I hope you win some trick or treat goodies!!!

Pin It

Wednesday, October 24, 2012

FABSCRAPS HERITAGE RANGE WITH CAMEO

Hi everyone Marelle here!

I have been playing with the gorgeous papers from the Heritage range - I thought I would share my work with you today.

Materials I used:

  • One sheet of Fabscraps Heritage Script Paper
  • Fabscraps large brass cameo : I painted it red to match the mist
  • Book Paper - from an old Dictionary
  • X-Press It Double Sided Tape size:6mm
  • X-Press It Glue Marker
  • X-Press It Clear Glue
  • Canvas alphas
  • Red Mist
  • Small black and white photograph
  • Cream Canvas alphas
  • Script stamp
  • Black stamp pad
  • Black scrapbooking pen


I have a created a simple layout that uses only one small black and white photo, I like the use of lots of negative space which draws your attention not only to the photo, but to the altered cameo. I used X-Press it clear glue to attach the cameo to the page - it is the best adhesive clear glue I have ever used ! It sticks so well there is not a worry about embellishments falling off your page when you use X-Press it clear glue!
I also enjoyed using the X-Press it Glue Marker for the tiny alphas on this layout - it worked like a dream!
To further draw the eye to the photo I used some red mist and sprayed the ink at the top of the page and tapped the paper to dribble the mist down, and I repeated the same process across the page to form a "frame like" appearance.

I love this particular paper as it lends itself to a simple layout such as mine. I cannot wait to try some mixed media on it for a completely different look!

I love showing the flexibility of Fabscraps products, whether you like simple layouts or busy artsy ones Fabscraps will have the paper and embellishments to assist you to achieve an amazing project.
Pin It

FabScraps–Creating a Textured and Layered Background SNEAK PEEK

Hi everyone,

Sharmaine here, I’ve put together a little video showing how I created a textured and layered background using these

IMG_2853

Some punched FabScraps stars (leftover from another project)
and a recycled envelope (one of my favourite things to create with).
So why not pop on over to my blog to see the video and to see what I created with some FabScraps products.

Sharmaine

Pin It

Wednesday, October 17, 2012

FabScraps Heritage Range - “Heart & Soul”

Hi everyone I’m Sharmaine and I’ve been playing with some of the gorgeous papers that are in the FabScraps “Heritage” range. 

Products I have used:
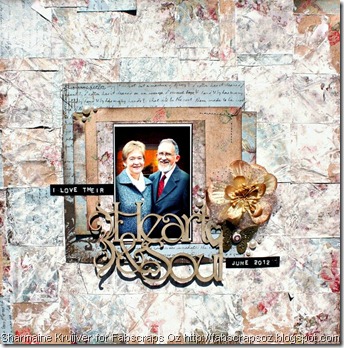
FabScraps Heritage paper
FabScraps Die-Cut Grey Chipboard “Heart & Soul”
FabScraps Boxed Filigree Embellishment
FabScraps Pearls
FabScraps Silk Flower
FabScraps Jelly Brad
X-Press It TripleTac Glue
X-Press It 6mm Double Sided Tape 
X-Press It Glue Marker

IMG_2712

First thing I did was cut up some of the paper into 2” squares
I then adhered these to some scrap cardstock using the TripleTac glue

IMG_2714

By using the glue, instead of tape, I was able to work quickly and get a lovely coverage all over the page.
To make my background more uniform (and not loose the photo into the background) I covered the background with some white paint.
I then crumpled up the page,

IMG_2716

to create a worn, quilted look, with specks of the gorgeous pattern paper showing through.

IMG_2720

I then backed my photo with some layers of the gorgeous pattern papers,

IMG_2719

before going to town adding embellishments.
A gorgeous silk flower

IMG_2717

and a FabScraps metal butterfly, kept in place with a FabScraps brad.
I’ve added some FabScraps pearls, adhered with the X-Press It Glue Marker .

IMG_2718

I’ve also used the glue marker to add the chipboard.
The chipboard was perfect for the title of my layout

Thanks for stopping by today.
Make sure you follow us on our facebook page so you can keep up with the latest FabScraps news!

Pin It

FabScraps Summer Collection- Sneak peek

Hello again everyone!!
It's Tarrah here with you again today!!
We hope you are all enjoying our projects that we are sharing with you here on the FabScraps blog!

I thought I would give you a little sneak peek of something I created after I completed my 'We Saw Seashells' layout the other day. If you pop over to my blog here you can find out what I created, I would love for you to say hi!!

Do I have you intrigued now?!!

Don't forget to become a follower of the FabScraps blog while you here so you can up to date with all the inspiration we have coming your way!!
Thanks for stopping by today, happy creating!!!

Tarrah :) 
Pin It

Tuesday, October 9, 2012

FabScraps Summer Range- 'We Saw Seashells By The Seashore'

Hello everyone and welcome to the all new FabScraps Oz blog!!!

We have some amazing products and some wonderful ways to show you how to make the most of these beautiful products so without further ado I will first introduce myself....
My name is Tarrah McLean and today I am going to show you the most gorgeous summer range you have EVER seen. It is so adorable and fun and easy to create with as well. 
FabScraps have some pre-cut pinwheels in this gorgeous summer range, they were super quick to put together and I have included them on my layout for you today.

First of all I gathered everything I wanted to use:

  • FabScraps Summer Range including the Summer Pinwheels
  • FabScraps Chipboard Anchors
  • FabScraps Metal Embellishments
  • FabScraps Pearls 
  • X-Press It Clear Gel Glue
  • X-Press It 6mm Double Sided Tape


I created my pinwheels first and as these are already pre-cut it was super duper quick and easy. I attached them using a fabulous FabScraps pearl embellishment.

I made two small pinwheels and 1 large pin wheel for my layout...

 These fabulous anchor chippie pieces are also perfect for leaving raw or altering as I have done by inking it up a little..

Next I began to put my layout together by trimming my papers 

and designing my layout. I chose to use a black and white 4 x 6 landscape photo as this suited my design and  it went so well with the FabScraps Summer range.

I also added some of the FabScraps super cute metal embellishments from the Summer range to add more detail and to enhance the title of my layout.

How cute does the starfish metal charm look tucked in with the pinwheels?

I chose to leave my anchor chippie piece partially raw to give a worn effect....

 and here is my finished layout....

Make sure to become a follower of the FabScraps blog on the left hand side bar to keep up with all the exciting reveals and news we have coming up. You can also join our Facebook page here. There will be plenty more inspiration to get you going  so be sure to check back often. Thanks so much for stopping by today, happy creating!!!

Pin It

Monday, October 8, 2012

FabScraps is in Australia!!

FabScraps has reached Australia and you should see it starting to pop up in your favourite scrapbooking stores.

The FabsScraps Oz blog has been designed to share the beautiful ranges with you and to inspire you with fun and innovative ideas.

Make sure you follow us on our facebook page for all of the latest FabScraps news!
 
Click here to find a stockist near you!

Pin It